👉Das Buchungs-Pop-up ist eine kompakte Version der Buchungsseite, die du entweder über die Buchungsliste oder den Zimmerkalender öffnen kannst.
So hast du alles Wichtige auf einen Blick:

Aus der Buchungsliste öffnen:
Wähle Buchungen im Hauptmenü und finde die Reservierung mithilfe der Filter:

Wenn du die Buchung gefunden hast, klicke auf das Augen-Symbol und das Buchungs-Pop-up erscheint:

Aus dem Zimmerkalender öffnen:
-
Wähle Zimmer im Hauptmenü und klicke einmal auf die Reservierung, die du öffnen möchtest.

-
Das Buchungs-Pop-up öffnet sich sofort:

Die Seite nach Abschnitten erklärt:
Buchungs-Header Information
Wichtige Details

-
Buchungsnummer: Die eindeutige Systemnummer der Buchung.
-
Buchungs-ID kopieren: Um die ID effizient an anderer Stelle im System einzufügen.
-
Attention Tag (Achtung): Das rote Warnsymbol weist dich auf wichtige Notizen oder Details hin, die deine sofortige Aufmerksamkeit erfordern.
-
Farbcodierung: Weise jeder Reservierung eine benutzerdefinierte Farbe zu, unabhängig vom Status. So kannst du Buchungen für eine schnellere Identifizierung kategorisieren.
Hinweis: Stelle sicher, dass dein gesamtes Team weiß, was die Farben bedeuten, um einen einheitlichen Arbeitsablauf zu gewährleisten.
-
Aufgaben-Button: Verwalte alle mit der Reservierung verknüpften Aufgaben, um rechtzeitige Follow-ups und ein persönliches Gästeerlebnis zu garantieren.
💡 Tipp: Siehe Artikel „Wie funktionieren Aufgaben?“ und „Wie erstelle ich eine Aufgabe?“.
-
Firmenprofil: Füge ein Firmenprofil für Geschäftsbuchungen hinzu oder ändere es, um eine korrekte Abrechnung sicherzustellen.
-
-
Mehr (Extra Optionen):

-
Datei hinzufügen: Lade Dateien zur Buchung hoch oder sieh dir Anhänge an.
-
E-Mail senden: Nutze Vorlagen für Bestätigungen oder Benachrichtigungen anden Gast.
-
Verlauf Ansehen: Verfolge alle Änderungen, die an der Buchung vorgenommen wurden.
-
Verlauf Anseheb v2.0: Verbesserte Version der Historien Funktion
-
Label bearbeiten: Tags hinzufügen oder entfernen.
-
Buchung duplizieren: Kopiere die Details für eine neue Buchung.
-
Meldeschein: Zum Bearbeiten oder Drucken des Meldescheins sowie für den Online-Check-in.
-
-
-
Erstellungsdatum & Uhrzeit: Sieh genau, wann die Buchung ins System kam (via OTA oder manuell erstellt).
- Label:

Label machen Kollegen auf spezielle Anforderungen aufmerksam.
Allgemeine Informationen
Dieser Abschnitt gibt dir Einblick in die Herkunft der Buchung. Hier kannst du Informationen über die Person, die gebucht hat, einsehen und verwalten.

-
Kanal (Buchungskanal): Zeigt die Quelle (OTA, eigene Website/Booking Engine oder manuell durch einen Mitarbeiter erstellt.
-
Referenznummer: Die ID, die der Kanal/OTA der Buchung zugewiesen hat.
-
Bucher: Der Name der Person, die gebucht hat (bearbeitbar).
-
Status: Bestätigt, Teilweise Bestätigt, Auf Anfrage, Angebot oder Storniert.
-
Stornierungsbedingungen: Die mit der Buchung verknüpften Stornierungsbedingungen. Durch Klicken auf das Info-Icon werden die Details der Stornierungsbedingungen angezeigt (sofern diese korrekt eingerichtet sind).
-
Bearbeiten-Button: Das Stift-Symbol ermöglicht es dir, die allgemeinen Details bei Bedarf zu ändern.
Kommentare
Interne Notizen
-
Nutze dieses interne Feld, um Gästepräferenzen oder Team-Notizen zu hinterlegen. Anders als „Bemerkungen“ (die von OTAs synchronisiert werden sind diese Hinweise ausschließlich intern und für Gäste oder Dritte nicht sichtbar.

Das Badge zeigt die Anzahl der zur Buchung hinterlegten Notizen an, wobei die letzte Notiz angezeigt wird:

Klicke auf das Augen-Symbol, um alle Notizen anzuzeigen.

Oder erstelle direkt aus dem Buchungs-Pop-up eine neue Notiz:
Bemerkungen
Hier stehen Kommentare des Gastes aus dem Buchungsprozess sowie relevante Anmerkungen vom Buchungskanal.

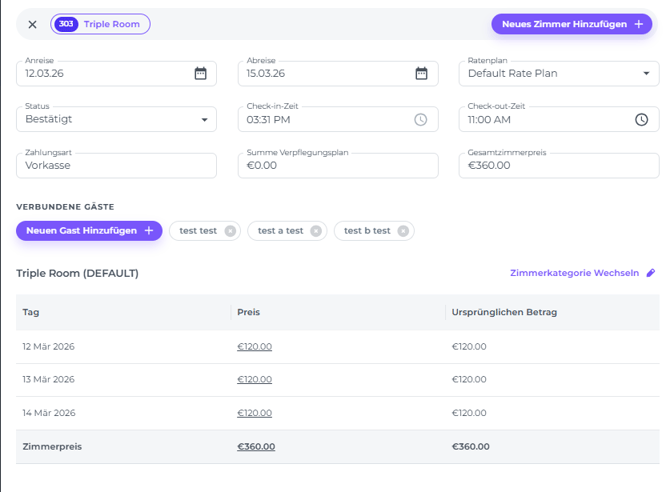
Zimmerzuweisung und Details
Übersicht der Zimmer- und Gästedaten. Klicke auf ein Detail oder das Stift-Symbol für Aktionen; Check-in/Check-out sind hier ebenfalls möglich.

-
Zimmernummer: Das zugewiesene Zimmer.
-
Schloss-Symbol: Zimmer sperren, um Umbelegungen zu verhindern („Do Not Move“).
-
Zimmertyp: Der zugewiesene Typ.
-
Gästenamen: Alle Namen der zugehörigen Gäste.
-
Status: Aktueller Stand der Buchung: Zukünftig – Im Haus – Anreise – Abreise – Verbleiben – Eingecheckt – Angekommen – No Show.
-
Verpflegungsplan: Meal Plan verwalten (z. B. ÜF – Übernachtung/Frühstück).
-
Aufenthaltsdaten: An- und Abreisedatum (änderbar).
-
Zimmer-Management: Zimmer wechseln oder Gäste innerhalb der Buchung umverteilen.
-
Check-In/Check-Out: Schnelle Abwicklung direkt im Fenster.
- Mehr: Anpassen weiterer Details bei Bedarf
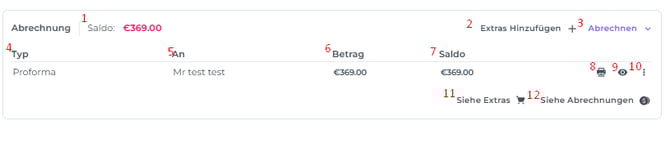
Abrechnungsbereich
Hier verwaltest du alle Finanzen an einem Ort
-
Saldo: Gesamtsumme des Belegs, (der Betrag zu zahlen oder zu erstatten).
- Extras hinzufügen: Buche zusätzliche Leistungen (Items) auf das Zimmer.
💡Tipp: Siehe Artikel „Wie füge ich einer Buchung Extras hinzu?“. - Abrechnen: Begleiche die Rechnung über verschiedene Optionen.
💡Tipp: Siehe Artikel "So zieht man Zahlungen auf der Buchungsseite ein" -
Typ: Belegart -Proforma, Rechnung, Gutschrift, Zahlung und Rückerstattung.
-
An: Empfänger des Belegs.
-
Betrag: Gesamtbetrag der Reservierung
- Saldo: Noch zu zahlender Betrag
- Drucken: Dokument drucken
- Anzeigen – Die Details des Belegs ansehen.
- Mehr Optionen: Für jedes Dokument stehen mehrere Aktionen zur Verfügung:
Proformaoptionen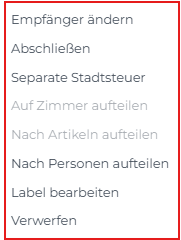
-
Empfänger ändern – Wähle deinen neuen (verfügbaren) Zahler aus den Gästen, Reisebüros oder Firmen aus.
-
Abschließen – Schließe die Proforma ab, um eine Rechnung zu erstellen.
-
Separate Stadtsteure – Hierdurch wird die Kurtaxe von der Proforma getrennt, falls diese von einem anderen Zahler beglichen wird.
-
Auf Zimmer aufteilen – Erstelle bei Buchungen mit mehreren Zimmern separate Proforma-Dokumente für jedes Zimmer. Dies ist ideal, wenn verschiedene Parteien für ihre eigenen Übernachtungskosten verantwortlich sind.
-
Nach Artikeln aufteilen – Trenne spezifische Extras oder Nebenkosten auf einzelne Proforma-Dokumente auf. Dies ermöglicht eine flexible Abrechnung, wenn verschiedene Zahler jeweils bestimmte Posten übernehmen.
-
Nach Personen aufteilen – Erstelle separate Proforma-Dokumente oder Rechnungen für jeden Gast. Perfekt für Gruppenbuchungen, bei denen Gäste individuell zahlen oder persönliche Belege benötigen.
-
Label bearbeiten – Füge der Proforma ein Tag hinzu, um sie zu kategorisieren.
-
Verwerfen – Entferne die Proforma aus der Dokumentenliste.

-
Rechnungsempfänger ändern – Wähle den neuen (verfügbaren) Zahler aus den Gästen, Reisebüros oder Firmen aus.
-
Tags bearbeiten – Füge der Rechnung ein Tag hinzu, um sie zu kategorisieren.
-
Gutschrift erstellen – Eine Gutschrift (Credit Invoice) reduziert den geschuldeten Betrag. Nach dem Erstellen einer Gutschrift muss eine neue Rechnung generiert werden.
Zahlungoptionen

-
Empfänger ändern – Wähle deinen neuen (verfügbaren) Zahler aus den Gästen, Reisebüros oder Firmen aus.
-
Wechseln zu SO(Proforma)Rechnung – Wähle aus, welcher Proforma oder Rechnung die Zahlung zugeordnet werden soll.
-
Bezahlart ändern – Dies gilt nur für „Simple Post“-Zahlungen, die keine Payment Gateway-Option (und somit keine Schnittstelle zur Zahlungsplattform Stripe) erfordern. Simple Posts sind Barzahlung, Banküberweisung oder auf Rechnung.
💡 Tipp: Schau dir den Artikel „Was ist der Unterschied zwischen Simple Post und Payment Gateway?“ an.
-
-
-
Erstatten – Verarbeite eine Rückerstattung für diese Zahlung.
-
Tags bearbeiten – Füge der Proforma ein Tag hinzu, um sie zu kategorisieren.
-
11. Siehe Extras
Hier siehst du alle zur Buchung gehörenden Zusatzleistungen, mit der Option, diese nach Bedarf zu ändern oder zu entfernen.
12. Siehe Abrechnungen – Sieh dir alle Belegdetails an und erhalte die Möglichkeit, Proformas zu bearbeiten oder zu löschen bzw. manuelle Dokumente zu erstellen.