TAGS for your Payment Documents
If you would like to categorise your payments, tags are widely used by our clients and have proven to be highly efficient within the Noovy PMS.
CREATE a tailored Tags for your PMS first and use them to label your payment documents.
💡Tip:
Also check out our article : How to Create and Use Tags if you would like to know more about Tags in General.
Create your Payment tags following the below steps:
-
From the main menu choose Settings - Tags - + New Tag

-
Fill out the fields.
In Tag Types Select Document:

-
Full Name – Enter a suitable name for the tag.
-
Short Name – Enter an abbreviation of the full name.
-
Choose Colour – Select a colour from the standard options.
-
Custom Colour – Use the colour picker to create a custom shade.
-
Tag Types – Select the Document category to categorise your Payment Documents.
-
Enable/Disable Toggle – Use this to set the tag as active or inactive; useful if you are not yet ready to use it.
-
Click Save to confirm the creation of your tag.
Assign tag(s) while creating a Manual Payment:
- On the Booking page for the relevant booking, go to the Billing section to create a manual Payment, click Charge and select Manual:

- Fill out all required Fields:

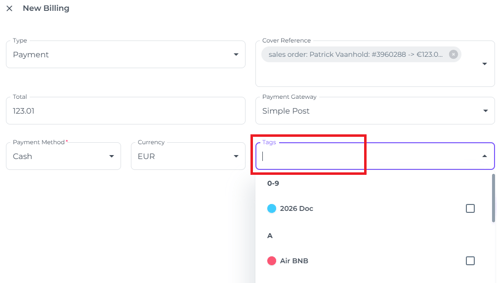
- Click on the arrow in the Tags field:

- Select which tag(s) you would like to assign:
- After all fields are correctly filled out, click Create New Payment:

- The Payment Document will be generated with the selected tag applied:

Assign Tag(s) to an existing Payment Document:
- On the Booking page, go to Billing, click the More Action Button (three dots) next to the payment:

- If the relevant payment is not visible in the Billing section, click the expand arrow next to the Proforma/Invoice:

- This will display the payment linked to the document:

- Select Edit Tags:

- Select the Tag(s) you would like to assign to the relevant Payment Document:

- Save and your Tag is assigned to the Payment Document:

Create a PAYMENT REPORT that filters by your chosen Tags.
- From the main menu select Reports - Payment Report and go to the Filter:

- Select the Tag(s) you wish to filter by; this will display all payment documents with those specific Tags.

- You can Export the report:

to an exel sheet
or to a PDF document: