User Profiles
User profiles are sub-accounts established under a primary hotel account, each configured with defined roles and granular access permissions. These profiles allow you to manage precisely which areas of the Noovy system your staff can view and modify. For example, you can:
-
Limit housekeeping team members to room status updates.
-
Grant front desk staff access to reservations and check-ins.
-
Allow managers full access to reporting, tariff management, and payments.
By assigning clear responsibilities and permission levels to every user profile, you protect sensitive data, minimise operational errors, and ensure that each team member interacts only with the tools and information relevant to their role.
This article focuses on creating a role. If you need to adjust what n existing user can see or do after the role has been created, please refer to our separate article on changing user permissions:
Creating a User Profile
This action is restricted to users who have permission to create and modify other user accounts.
-
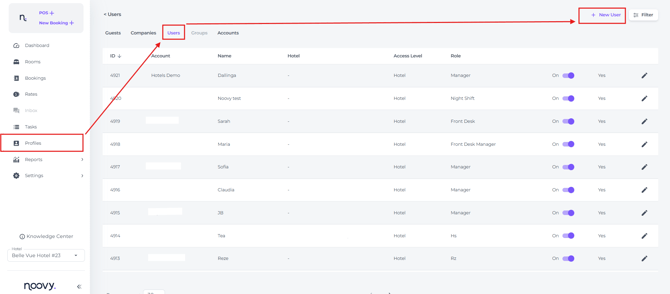
From the Main Menu go to Profiles > Users > + New User:
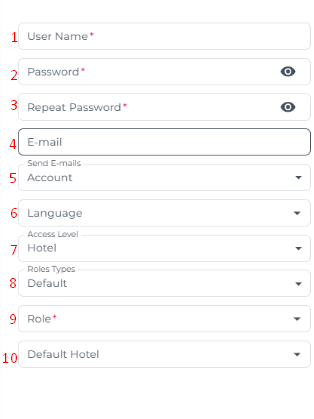
- A settings pop-up opens up where you fill out the fields:
-
User Name: Enter the team member’s name. If multiple people share the same first name, we recommend adding the first letter of their last name to distinguish between them.
-
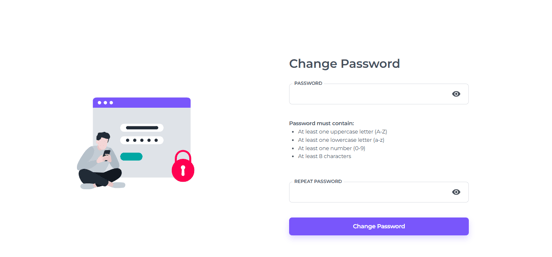
Password: This initial password is temporary. As soon as the user logs in for the first time, they will be prompted to change it and create their own secure password.
*If a user forgets their password, a manager can set a new one in the user profile. This password is temporary and must be changed at first login.
- Repeat password: Re-enter the password you specified above.
-
Email: Provide the user’s (work) email address.
-
Send Emails: Select who should receive system notifications: the main hotel account, the new user, or both.
-
Language: Select the language in which the user will work in Noovy.
-
Access Level: Define the user’s access permissions which will always be Hotel
-
Role Types: Select either default role type (with predefined permissions) or a custom role type (created by your hotel with tailored permissions defined by a manager). This selection controls which areas of the system the user can view and edit.
-
Existing Roles: Within the role type selected in the previous field (default or custom), choose the specific role you want to assign to this user.
-
Default Hotel: Select the venue (property or location) where this user will primarily work.
-
Click Save to create the new user profile. The profile will be on your list of users and immediately active.
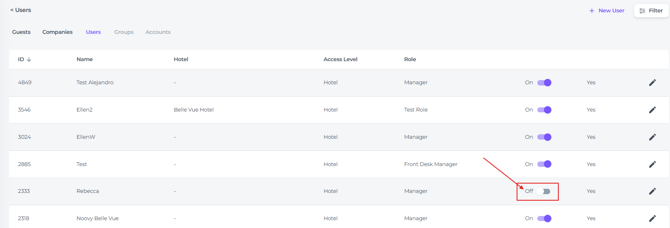
If you wish to deactivate, switch the toggle to off:
-
Click Cancel to discard the changes and exit the process.