Noovy Online Check-in in Short
The Noovy Online Check-in is a digital registration tool that guests can use prior to their arrival at the hotel. It can be seamlessly integrated into your confirmation or pre-arrival letters; simply create a button that guests can click to complete their registration. All details are automatically synchronised with the relevant reservation and visible on the Registration Form.
Furthermore, guests have the option to pay for their stay immediately or, should they choose to pay later, you can configure the system to automatically authorise their credit card.
💡Tip:
For more on the Online Check-In service check our article: The Online Check-In Tool
What is the purpose of setting up the Online Check In Form?

We advise you to customise the Online Check-in Form to suit your hotel's requirements, ensuring guests provide all necessary details.
Configuration of the details reflecting on the Online Check-In form
-
From the main menu go to Hotel Settings > Main menu - Settings - Hotel:
Example:
The screenshot below illustrates what guests will see once they have begun the Online Check-in/Registration process. As you will notice, not all fields are marked with an asterisk (*); this particular hotel has been configured with only a few mandatory requirements. You have the option to hide certain fields entirely or keep them visible for guests to complete at their discretion.

Within the Hotel Settings, you will find the 'Guest Data Settings'. The configuration of the Registration Form will be mirrored in the Online Check-in Form, ensuring both documents request the same information.
(The 'New Booking' dropdown menu is designed to configure which fields are hidden or visible and, more importantly, which fields are mandatory for Noovy users when creating a new reservation.)
Now that you are familiar with the basics, it is time to put them into practice.🙂
Follow the steps below to customise the Online Check-in form to suit your requirements:
Guest Data Set-Up:
- Navigate to your hotel settings via the Main Menu > Hotel, and click on the 'eye' icon to open them:

- Choose Settings from the options and locate the Guest data settings section:

-
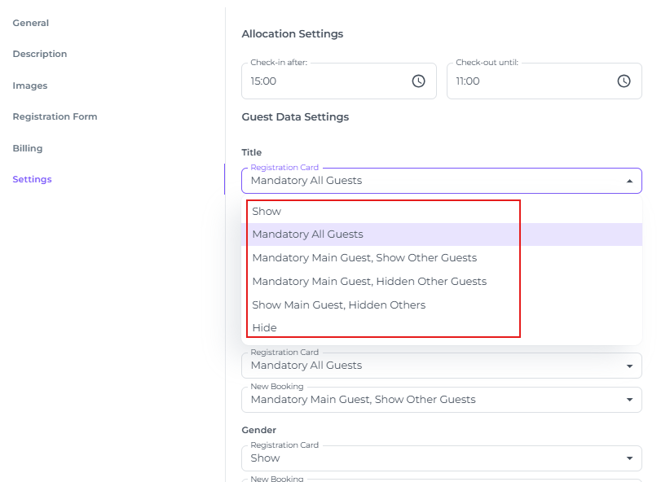
To configure the Online Check-in form, open the dropdown menus for the Registration Card Fields:

-
The dropdown menu explained:
-
-
-
- Show or Hide: This setting determines whether the field is visible to your guests.
- Mandatory All Guests: Sets the field as a compulsory requirement for every guest in the booking.
- Mandatory Main Guest - Show Other Guests: Makes the field mandatory for the lead guest while displaying it as an optional field for others.
- Mandatory Main Guest - Hide Other Guests: Requires this information from the lead guest only; the field remains hidden for all other guests.
- Show Main Guest - Hidden Others: Displays the field to the lead guest as an optional item while hiding it entirely from other guests.
-
-
Pay or Pay Later
By default, the 'Pay' button is enabled.
The 'Pay Later' option will by default be shown for all bookings.
It is possible to disable the 'Pay Later' option for Non-Refundable bookings. This configuration is managed within a separate section of the Hotel Settings, the Registration Form tab:
- In the hotel settings go to the Registration form tab:
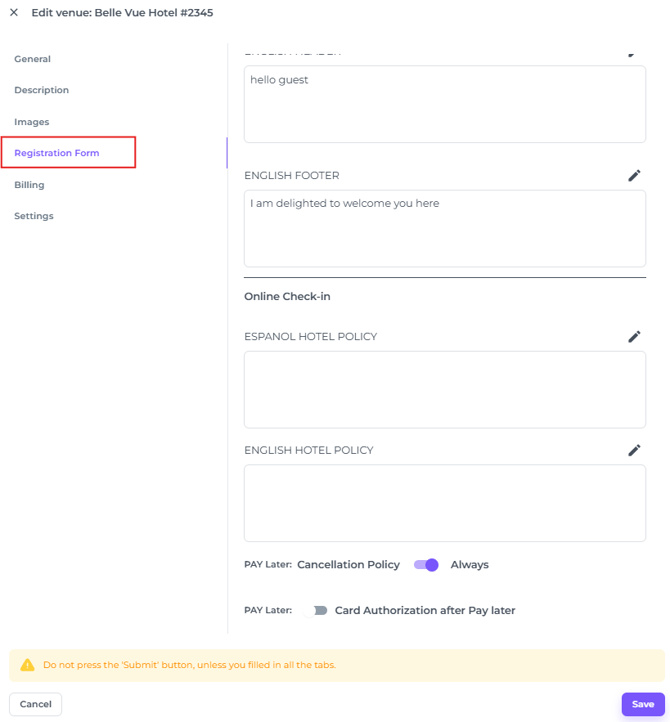
- Scroll to the bottom of the page and toggle the switch to 'Pay Later' Cancellation Policy:

-
You can also enable the Pay Later option, provided you obtain the guest’s consent to use their credit card if needed.
When a guest selects Pay Later, you are authorised to place an authorisation (a temporary hold of an amount) on the card.
To set this up, turn on the Card Authorisation after Pay Later toggle:

What happens after Pay Later is chosen at the Online Check in?
When the Card Authorisation after Pay Later option is enabled, the Pay Later button will be shown during Online Check-in.
If the guest chooses this option, the system triggers two‑factor verification so the guest explicitly agrees that the hotel may use their credit card. This significantly reduces the likelihood of chargebacks.
Below video will illustrate what happens when guests choose the Pay Later option: